-
 Create an Realistic Dark Ocean Text Effect in Photoshop درس كلللش حلو
هلووووووووووووووو
شلونكم شباب و بنات انشالله بخير اليوم جبتلكم درس بالانكليزي يعلمكم اشلون اسون كتابة بعمق المحيط
وحاولت اترجم الدرس بس مكدرت اوصل الفكرة كاملة يعني بالانكليزي تفتهم اكثر
واذا اكو خطوة ممفهومة كلولي واساعدكم بيه
اخليكم وية الدرس
Step 1
Firstly we will need a nice font, I used this font from dafont.com, however you're free to use any font you like.
Once you chose the font, create a new document in photoshop, size doesn't really matter here. I chose 800x400px because that's where my comfort zone is.
Fill the background with Black and save the document as "Ocean Text".
Step 2
Use the type tool to type some texts onto it.This will automatically create a new layer on top of the background layer.
If you choose the 800x400px canvas size in step 1, it's a good idea to choose larger size font here. However, you can always adjust the size of the font by holding down the CTRL + T together, then drag the corner of the text to alter the size. (You may also hold down SHIFT key while dragging, this will keep the dimension radio of the text).
See image below for the position I place my text:
 After placing your text, name this layer as "Text".
Step 3
We will now add some lighting and contrast for the text. Hold down your CTRL key and left-click on the "Text" layer, this will select the entire "Text" layer:
After placing your text, name this layer as "Text".
Step 3
We will now add some lighting and contrast for the text. Hold down your CTRL key and left-click on the "Text" layer, this will select the entire "Text" layer:
 Create a new layer called "shade", fill it with black and go to Filter > Render > Cloud to render some cloud (use white as foreground colour and black as background colour).
 Step 4
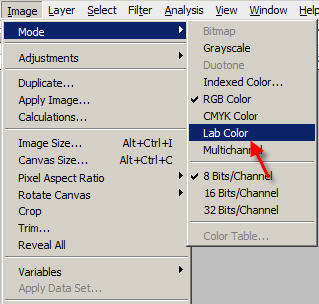
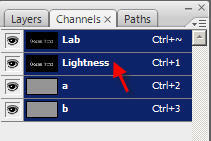
Now we can futher edit the lightness of the text. Go to Image > Mode > Lab Colour to change the image mode to LAB Colour, then go to channels palette and choose the lightness channel. See below images for details:
Lab Mode:
Step 4
Now we can futher edit the lightness of the text. Go to Image > Mode > Lab Colour to change the image mode to LAB Colour, then go to channels palette and choose the lightness channel. See below images for details:
Lab Mode:
 Channel:
 Then go to Filter > Sharpen > Smart Sharpen and use the following settings:
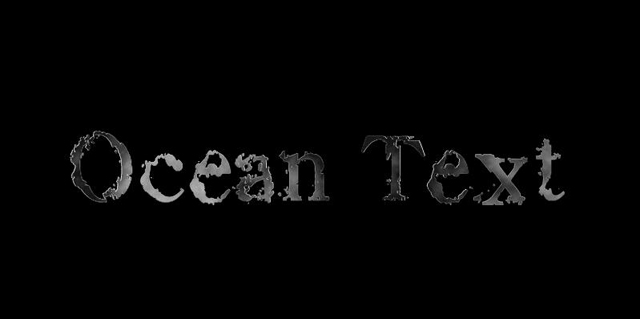
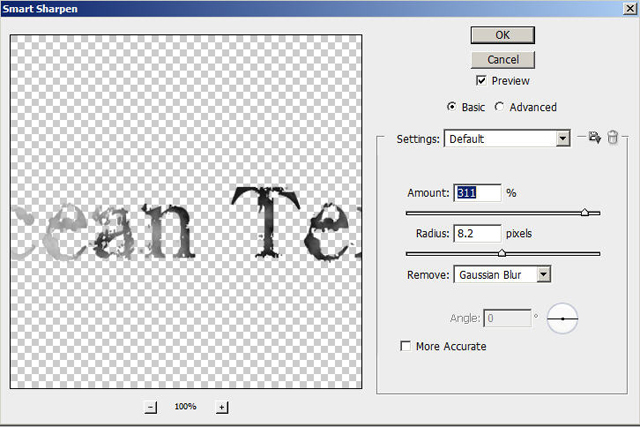 Optional: you may use smart sharpen a few time to further adjust the effect.
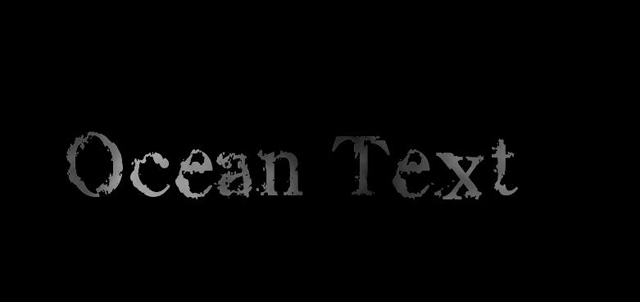
Here is the text effect so far:
Optional: you may use smart sharpen a few time to further adjust the effect.
Here is the text effect so far:
 Step 5
Change to image mode back to "RGB Color" by going to image > mode > RGB color. If you're prompted to flatten the image, choose "Don't flatten".
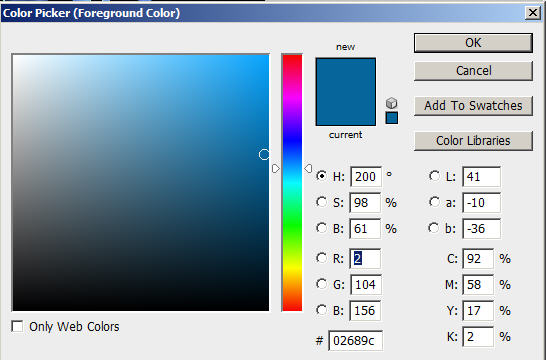
Create a new layer called "Ocean Colour" on top of every other layer, set its layer blending option to "Color dodge".
use a big brush and a ocean-blue colour, gently brush over the text, you may use the dodge, burn and sponge tool to adjust the lighting constrast. Detail setting see below:
Brush colour
Step 5
Change to image mode back to "RGB Color" by going to image > mode > RGB color. If you're prompted to flatten the image, choose "Don't flatten".
Create a new layer called "Ocean Colour" on top of every other layer, set its layer blending option to "Color dodge".
use a big brush and a ocean-blue colour, gently brush over the text, you may use the dodge, burn and sponge tool to adjust the lighting constrast. Detail setting see below:
Brush colour
 Dodge tool settings:
 Burn tool settings:
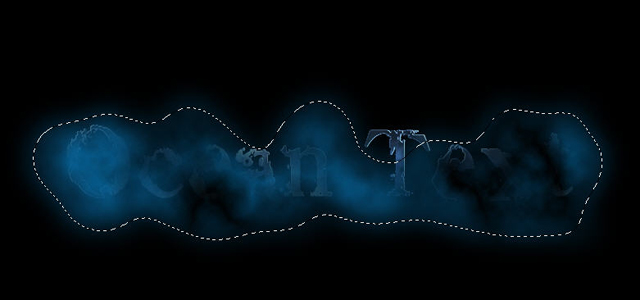
 Here is the effect so far:
 Step 6
Now can add some more ocean effect to the text. Create a new layer called "Cloud", and on the newly-created layer, use the Lasso Tool to select the outer of the text , fill it with black colour, then go to Filter > Render > Difference Cloud (Use the previous dark blue colour as foreground colour, black as background colour).
Your image should be similar to below:
Step 6
Now can add some more ocean effect to the text. Create a new layer called "Cloud", and on the newly-created layer, use the Lasso Tool to select the outer of the text , fill it with black colour, then go to Filter > Render > Difference Cloud (Use the previous dark blue colour as foreground colour, black as background colour).
Your image should be similar to below:
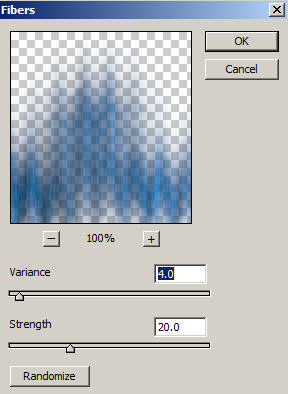
 Create a layer on top of the "cloud" layer and call it "fiber", right-click the layer and choose "Create clipping mask" and make it a clipping mask of "Cloud" layer. Fill this layer with black colour.
Go to Filter > render > fiber and use the following setting:
Create a layer on top of the "cloud" layer and call it "fiber", right-click the layer and choose "Create clipping mask" and make it a clipping mask of "Cloud" layer. Fill this layer with black colour.
Go to Filter > render > fiber and use the following setting:
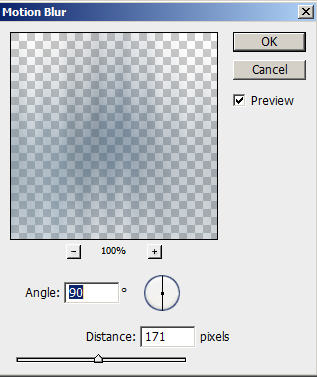
 Then use motion blur on the "Fiber" layer, details see below:
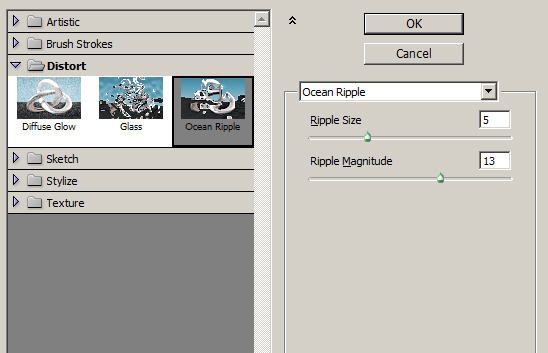
 After that, go to Filter > Distort > Ocean Ripple to create some ocean ripples, details see below:
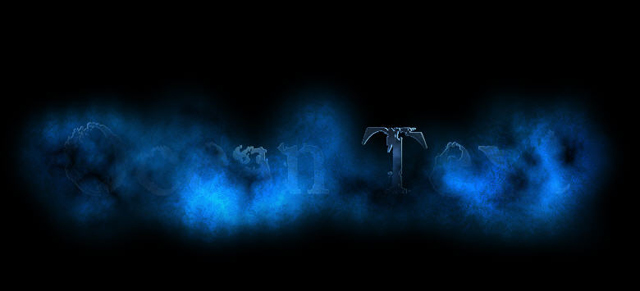
 You should now have the following image:
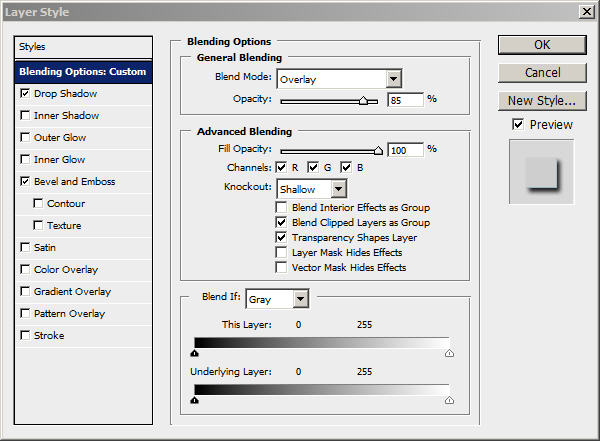
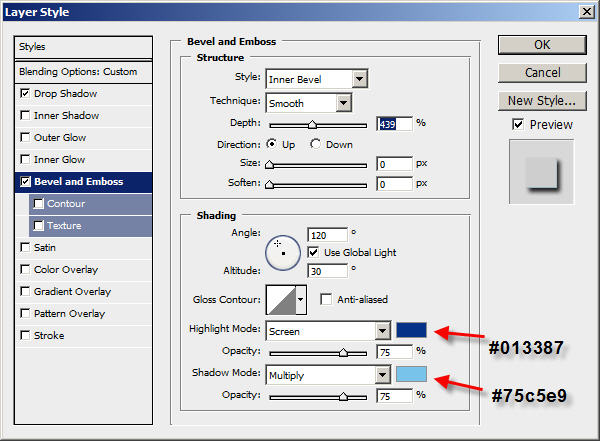
 Step 7
Now we can move the "fiber" and "cloud" layer below the "Ocean Text" layer. Change the blending options of "Ocean Text" according to the following screenshots:
Step 7
Now we can move the "fiber" and "cloud" layer below the "Ocean Text" layer. Change the blending options of "Ocean Text" according to the following screenshots:

 Step 8
Right-click on the "Ocean Colour", select "Create Clipping Mask" and make it a clipping mask to the "shade" layer.
Duplicate the "Cloud" layer once and put it on top of every other layer, change its blending style option to "overlay".
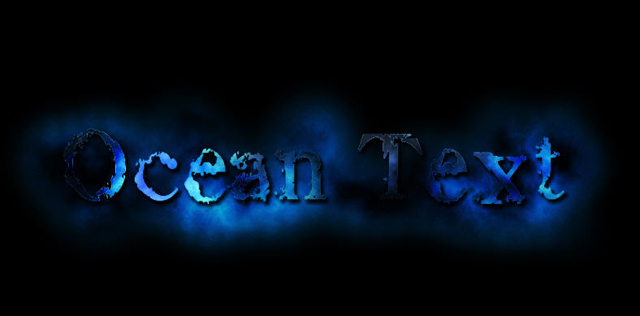
Now you will have the following image:
Step 8
Right-click on the "Ocean Colour", select "Create Clipping Mask" and make it a clipping mask to the "shade" layer.
Duplicate the "Cloud" layer once and put it on top of every other layer, change its blending style option to "overlay".
Now you will have the following image:
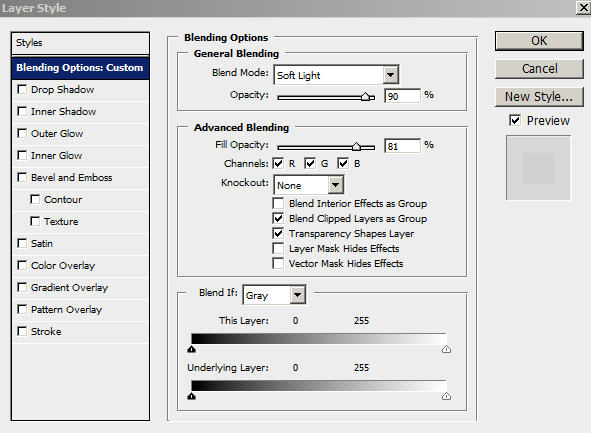
 Step 9
Now save your document as a JPEG file, then load it back into Photoshop, duplicate the background, and change the blending option as following:
Step 9
Now save your document as a JPEG file, then load it back into Photoshop, duplicate the background, and change the blending option as following:
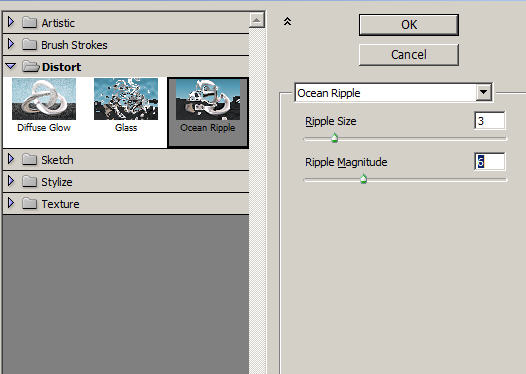
 Then go to Filters > Distort > Ocean Ripple and apply the following settings:
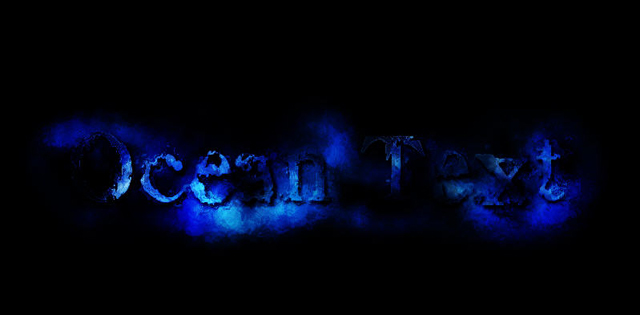
 Apply this filter a couple of times, then you will have the following result:
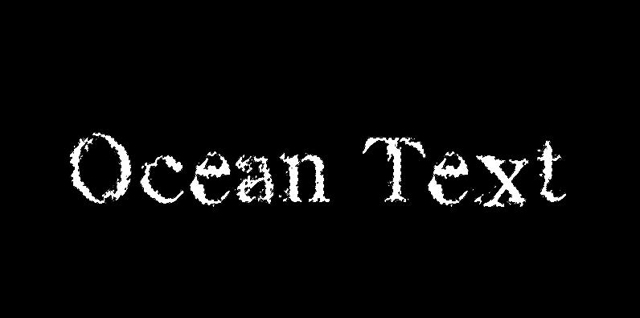
 That's it for this tutorial! You can use your own creativity and innovation to add whatever effect you want to have.
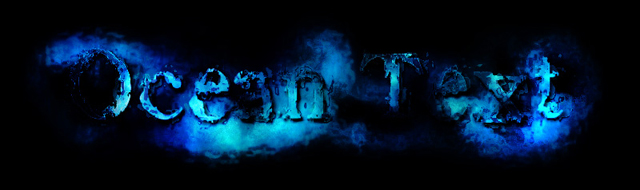
Here is my final result for this tutorial:
That's it for this tutorial! You can use your own creativity and innovation to add whatever effect you want to have.
Here is my final result for this tutorial:
 انشالله يعجبكم
احدث المواضيع:
-
فد شي خورافي
عاااااااااشت ايدك
لا تحرمنا من جديدك
تحياتي..
-
-
-
-
رد: Create an Realistic Dark Ocean Text Effect in Photoshop درس كلللش حلو
 ضوابط المشاركة
- لا تستطيع إضافة مواضيع جديدة
- لا تستطيع الرد على المواضيع
- لا تستطيع إرفاق ملفات
- لا تستطيع تعديل مشاركاتك
-
قوانين المنتدى


 رد مع اقتباس
 عضــ هستوة طالع من الباكيت ــو


